How to add your website to Google search
Search Engine Optimization (SEO) is a crucial compnent to channel the growth of your website and garner more attention. But to even begin your SEO journey your website must first show up on Google search! In this post I will take you through step-by-step from setting up your site on Google Search Console and then establishing the sitemap so that your website will appear and be returned in the search results.
Google Search Console
First you will need to have a website up and running either with a custom URL or a partially custom URL provided by a host (e.g. Netlify). To add your website to Google search
Now that you have begun your journey on setting up a Google Search property, should you go with Domain or URL prefix? The answer is it depends.

The key difference across the two properties lies in the underlying verification process. According to Sam at SEMrush:
Domain Property allows “…Google to track all URLs across all subdomains of a website. That will encompass subdomains beginning with ’m.‘, ‘www.’, and any other option you can imagine.”
URL prefix allows Google to “…only track data for the single, specific URL you specify. That means the URL with the exact protocol and subdomain you enter.”
Most importantly Domain only supports Domain Name System (DNS) verification. Whereas URL prefix will auto verify if you have a Google Analytics property account registered under th same email. Additionally, URL prefix properties will not include any variations of your website URL in the search (e.g. https
Adding Sitemap
Now to help Google search with indexing the content for your webpage and understand the overall layout architecture you need to add a Sitemap.
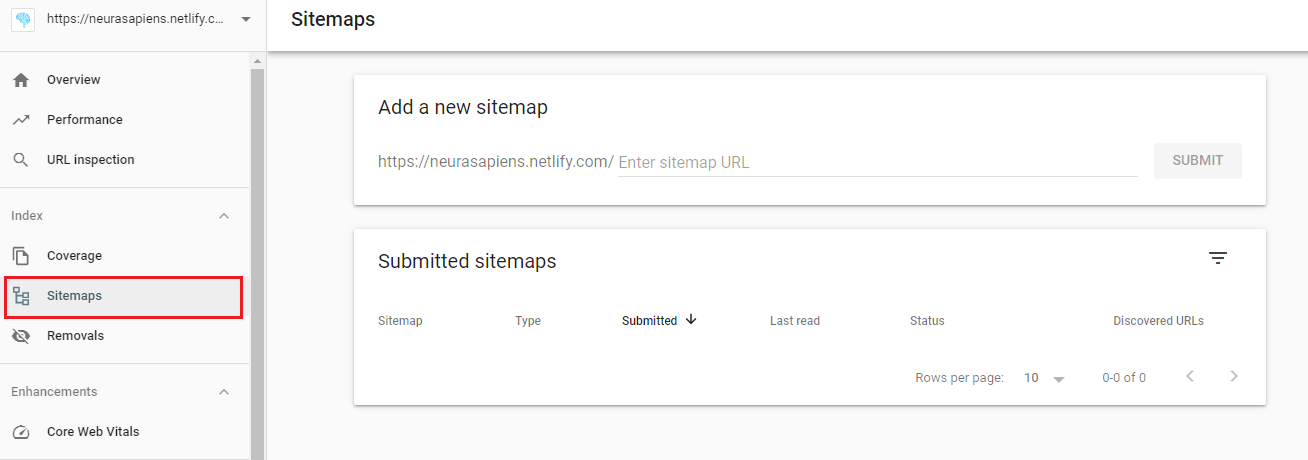
To do so navigate to the left sidebar panel and select Sitemaps under the Index section. This will take you to the Sitemaps tab with two sections Add a new sitemap and Submitted site maps.
Upon entering your domain/URL name when regestering your Google Search Console property, Google would have already entered by default your website name:

All you would have to enter now the page name to route from your website to your sitemap file. Typically, this would just be named sitemap.xml. So the completed website link for adding a new sitemap would look as follows:

Now that you have added your sitemap URL/filename the Submit button would turn Blue and all you have to do now is click Submit and you are all done with adding your sitemap. Congratulations!
Indexed and what next
If your sitemap was added successfully then you would see the date it was submitted, the time it was last read by Google Search Console, but most importantly a green Success sign under ‘Status’.
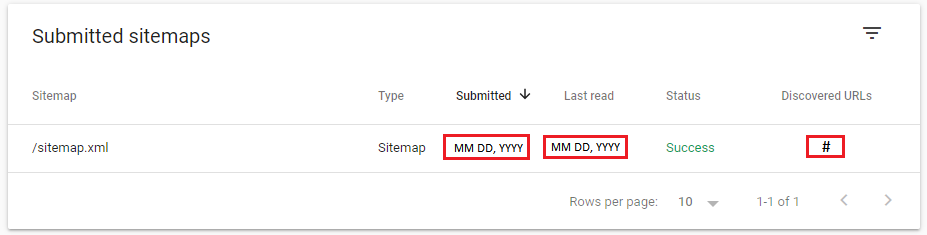
It is important to note that in the figure the “Submitted” and “Last read” dates are in the format MM DD, YYYY and not the actual dates as they would vary and is realtive to when you first successfully submitted (e.g. Nov 15, 2020) your sitemap.
Similarly, the hashtag (#) under Discovered URLs would be replaced with the actual number of URLs discovered by Google Search Console from your website layout structure (e.g. 51).
According to Ramona at iMPACT:
”…it seems to take as little as 4 days and up to 6 months for a site to be crawled by Google and attribute authority to the domain.”
So the secret formula here is patience, there is no fast tracking this process. But you are alrady ahead of the pack having followed the steps outlined in this post to establish a search console property and submitting a sitemap for Google Search to better understand your website architecture. Rest assured your website is one step closer to getting ranked in Google searches.
Keep Learning:
- How to set up Google Universal Analytics Property
- How to create a post in Hugo
- How to extract string after space in Excel